Modernizing a site with Netlify, CircleCI, Preact-CLI and AWS
Leaning into modern web tools to rebuild worthawatch.today
Posted on | Comments
Worth a Watch is a site of mine that tells me which NBA games are worth watching from the night before: a vital service for any europe-based basketball fan!
I threw it together a couple of years ago when learning to use AWS lambda and the code was so hacky it was only ever going to be understandable to me. It was built using:
- A static site hosted on S3
- A lambda function responsible for returning the list of games
- Dynamo DB for caching the upstream API responses
- API Secrets kept out of source control by a .gitignore
- A crude mustache implementation written in inline JS to render the UI
- CSS written directly into a style tag in the head
- Deployed by copying and pasting CLI commands on my laptop
Last summer I wanted to work on the site with a couple of friends but the logic to build and deploy it was impossible to share and explain. It needed a rebuild and doing so gave me an opportunity to lean more heavily into some of the modern tooling that’s now available. These are the steps I took along the way.
1. Move the static site to Netlify
If you haven’t heard of Netlify it’s a platform for serving static sites. There are a lot of optimisations going on under the hood to make it efficient at doing this but what really makes it stand out is how user friendly it is. Within minutes you can be up and running with a full continuous integration and deployment pipeline for your site. That means no more copy and pasting CLI commands!
It took about an hour from opening an account to having something set up, and most of that time was spent trying to understand how to update the DNS on my domain name.
I was able to configure deployments and give team members access rights so they could make changes and see them reflected on the site within seconds - way better than what I had before!
2. Move the UI code to Preact-CLI
The good part about my previous implementation was it required zero network requests and was very lightweight. The bad part was everything else.
It’s a very simple UI but even so I wanted to write it in (p)react just because it’s so pleasant to use. I chose Preact over React purely because it was lighter.
One thing I definitely didn’t want to manage was an elaborate build process. All I wanted was to be able to compile JS and CSS and serve it in an optimised format. So I picked up Preact-CLI which is a zero config build tool with all the right optimizations and server rendering built in. I could write modern JS, use CSS modules and drop in whatever other static assets I needed, Preact-CLI would serve them up statically or via a hot-reloading dev server. It worked really nicely out of the box.
The only thing I opted out of here was service workers. It’s something I wanted to have total control of - partly because their power scares me and partly because it was a good opportunity to learn how they work myself. I added this functionality much later on.
3. Move the lambda to a netlify function
Netlify can also host and deploy lambda functions for you so this was an obvious choice for me because I could manage everything in one place. I decided to split the previous lambda function in two and have the part hosted on netlify only speak to a database rather than the third party API (due to rate limit reasons). I’d get the scores into the database another way later.
Actually getting the code running on Netlify functions was a matter of one extra line of configuration. So easy. This was the only part where I ran into a Netlify gotcha though which cost me a decent amount of time and confusion:
Netlify has a nice UI where you can add environment variables so that your secrets don’t need to be in the code themselves. I added my AWS credentials there so that netlify could speak to dynamoDB. As soon as I had done this all my builds started crashing with a deploy error. I’d changed quite a few things so it wasn’t immediately obvious that it was due to the env variables.
Eventually I realised that adding my credentials as AWS_ACCESS_KEY_ID and AWS_SECRET_ACCESS_KEY actually caused Netlify’s own credentials to be overwritten. Yeahhh :/ I prefixed them with MY_ and everything started to work nicely again.
4. Set up CircleCI for the import workflow
That was the “Site” work fully done: it worked well and was easy to manage. I then had to build the other side of the architecture (the import workflow) responsible for importing the scores.
The import workflow is made up of a third Party API, a serverless function running on a cron and DynamoDB to store the API results. I split the import part out because I wanted to lean more heavily on the third party API and I knew it would mean I’d be rate limited at 10 requests per minute. I didn’t want users to have to wait a minute for the page to load.
It didn’t make any sense to use Netlify to manage deployment of this serverless function and I already had it hosted in AWS so I chose to keep it there. I still wanted a way to build and deploy it that didn’t directly involve my laptop though. Enter CircleCI, a free Build and Deployment platform that again you can get set up with in minutes.
I created an account and a CircleCI config file, and within 30mins of trial and error I had a workflow to deploy both master and branch builds to stage and prod environments.
5. Set up Secret Management using AWS Parameter Store
I needed a better way to manage API tokens now that the build wasn’t happening on my laptop. This turned out to be incredibly easy in the end because AWS has a service for providing just this: the Parameter Store.
You can set secrets via the CLI, or via the AWS Console, and then fetch them using a really simple promise API with the aws-param-store npm package.
6. Retry requests when Rate Limited
I knew I was likely to be rate limited often so I wanted to be able to retry the request until it succeeded. This approach was possible because the requests were asynchronous to any actual user action.
I was tempted to write this logic myself but ultimately there was no need as this fetch-retried npm package did just the trick. It backs off exponentially between retries until the request has been fulfilled.
7. Use AWS SES to remind myself when the API Token expires
At this point we had a fully working system. The last remaining itch I wanted to scratch was token expiration. The API I was working with didn’t have a way to automate token renewals which meant that each month I had to remember to go to the UI and generate a new one.
I decided that one thing I could do was send myself an email reminder just before it was about to expire. Accomplishing this with SES was again fairly straightforward just by following a few online guides.
I created a new lambda which ran daily and calculated the remaining days left on the token. If it was close to expiring I sent an email using the SES library in the AWS-SDK npm package (my code). As everything was running in AWS I just had to grant my lambda function access to SES by extending the IAM role and updating my serverless.yml file.
And that’s it!
I essentially copy and pasted my way to a pretty robust architecture! I had rarely touched any of these tools before and was able to navigate them fairly easily by reading tutorials and blog posts. I was constantly impressed by how far along the tooling has come though, most of it was very user intuitive, and how quickly you can get a system up and running.
In total it took about a week of off-and-on work to get to this point and it ended up looking like the below (not including the email system):
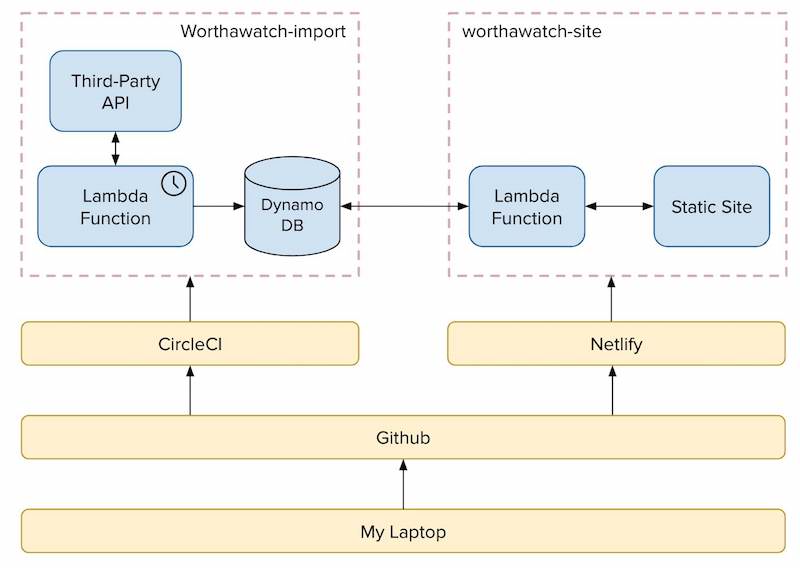
The code has simplified a little bit since the initial build (I eventually switched APIs to one that without aggressive rate limiting) but the code is all more or less still there and free to browse:
And, if you need to know which NBA games were worth watching (spoiler-free!), you can do so at https://www.worthawatch.today :)